When you customize designs in the Title Designer (which is available in all Titler Live products except Express), you can create variables for objects which allows people or data sources to display custom information in a graphic, including variables for text, colors, gradients, images, and pre-recorded videos. You can also create variables for data-driven designs, including Facebook polls, scoreboards, live videos, data graphs, and more.
Note: The Title Designer and the features described in this article are not available in Titler Live Express.
- In Titler Live's playout interface, open a project (if a project isn't already open) and select a graphic in the playlist.
Tip: Want to create a new graphic? Open the Library panel and drag a design from the library to the playlist, or choose File > New Design.
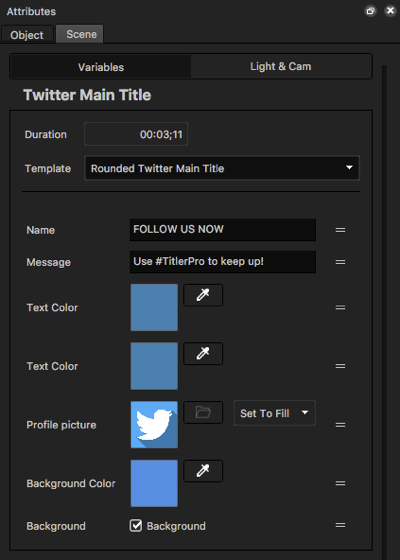
- Click the Edit Title Design button in the Attributes panel. The selected graphic opens in the Title Designer. In addition, the Attributes > Scene > Variables tab opens, which shows all variables that are in the design.
Tip: To change the order of variables, click a reorder
 button and drag the variable to a new position.
 - If you haven't already created and customized the objects for which you want to create variables, do so now. For details, see the articles in the Customize text, objects, and scenes section of our help center.
- See the following sections to create variables. When you're finished, you can view the variables in the Attributes > Scene > Variables tab of the Title Designer and in the Attributes tab of the playout interface.
Reminder: When you close the Title Designer, you'll be prompted to save all changes to the design.
Create color, gradient, image, and pre-recorded video variables
- Select an object in the Title Designer's workspace or timeline.
- Click the Attributes > Object > Style tab.
- Select the Color, Gradient, or Image/Video option in the 3D or 2D style layer section.
- Mark the Variable checkbox in the 3D or 2D style layer section.
- If you plan to connect the variable to a data source, select a data source from the drop-down list below the Variable checkbox and on the left. Otherwise, if you plan to manually enter data for the variable, select None or leave the selection blank.
- In the drop-down list below and to the right of the Variable checkbox select a name for the variable.
Tip: To create a new variable name, double-click the name that is already selected in the drop-down list, enter a name, and press TAB to save the new name.
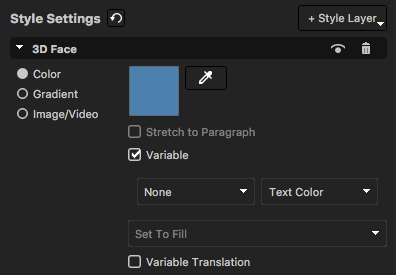
- Image and video variables only: If the Image/Video option is selected and you want to control how an image or video fits within the variable layer's bounding box, select one of the following options from the Set To… drop-down list.
- Set To Fill: The image fills all of the available space in an image variable's bounding box and maintains its proportions.
- Set To Fit: The image fits inside the variable's dimensions without cropping and retains its aspect ratio, which means the image may not fill the entire variable area.
- Set To Conform: The entire image resizes to fit in the entire variable area, but may not maintain its aspect ratio.
Later, after you finish customizing the design and close the Title Designer, if you want to connect your design to a data source and drive data to a variable, see one of the articles in the Connect data to designs section of our help center.
Translate color, image, and pre-recorded video variables
Note: Gradient variables can't be translated.
- Create a variable if you haven't already, as described in the Create color, gradient, image, and pre-recorded video variables section.
- In the Attributes > Object > Style tab, mark the Variable Translation checkbox in the 3D or 2D style layer section.
- Double-click the field in the Value In column and enter the incoming value that you want to replace.
- Double-click the field in the Value Out column and enter the value that you want to display in the graphic.
- Repeat the previous two steps for each value that you want to translate.
Create text variables
Text variables can be names, titles, or any other alphanumeric information.
- Select an object with text in the Title Designer's workspace or timeline.
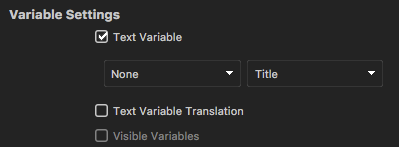
- Click the Attributes > Object > Global tab.
- Mark the Text Variable checkbox in the Variable Settings section.
Note: This checkbox is already marked if you added this text object as a text variable, as described in Add and modify text.
- If you plan to connect the text variable to a data source, select a data source from the drop-down list below the Text Variable checkbox and on the left. Otherwise, if you plan to manually enter data for the text variable, select None or leave the selection blank.
- In the drop-down list below and to the right of the Text Variable checkbox select a name for the variable.
Tip: To create a new variable name, double-click the name that is already selected in the drop-down list, enter a name, and press TAB to save the new name.
Later, after you finish customizing the design and close the Title Designer, if you want to connect your design to a data source and drive data to the text variable, see one of the articles in the Connect data to designs section of our help center.
Tips
- To translate data in text variables (for example, to display 1st in a graphic when 1 is entered in the variable), see the Translate text variables section.
- To create a variable for the text's color or other style attributes, see the Create color, gradient, image, and pre-recorded video variables section.
Translate text variables
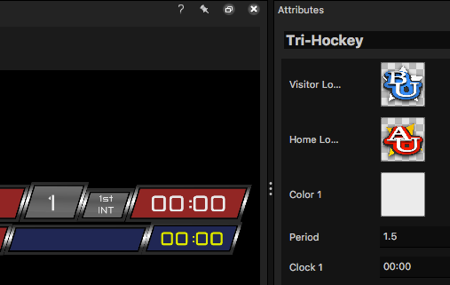
Titler Live can read incoming data and display alternate text in a graphic. For example, if you create a scoreboard for a hockey game, which includes three periods and an intermission after the first and second periods, most scoreboard controllers represent the first intermission as a value of 1.5 and the second intermission as a value of 2.5. With the text translation variable, you can enter a value that you want to appear in the graphic for certain incoming data.
- Create a text variable if you haven't already, as described in the Create text variables section.
- In the Attributes > Object > Global tab, mark the Text Variable Translation checkbox in the Variable Settings section.
- Double-click the field in the Value In column and enter the incoming value that you want to replace.
- Double-click the field in the Value Out column and enter the text that you want to display in the graphic.
- Repeat the previous two steps for each value that you want to translate.
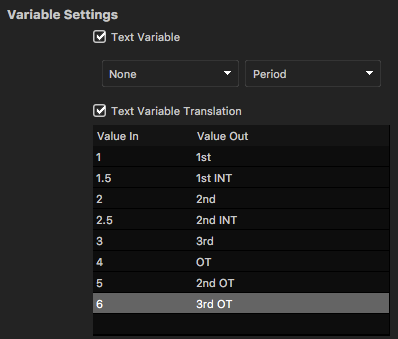
The following illustration shows the Period variable's incoming data is 1.5 which is translated to 1st INT in the graphic.
Create data graph variables
Use data graph variables with text or shape objects to show a percentage or quantity that changes dynamically based on incoming data.

- In the Title Designer's workspace or timeline, select an object that you want to represent data, or create a new object. The object must include a starting animation effect, transition, or keyframe. If the object doesn't include one of those attributes, the data graph variable will reflect the correct values, but will remain static.
Note: If you don't connect the object to a data source that is sending numeric values, or if you will connect the object to a data source other than a Facebook comment or reaction poll, the data graph variable can only be used to represent percentages by text or image.
- With an object selected in the design, click the Attributes > Object > Global tab.
- Mark the Data Graph Variable checkbox in the NTX Playback Features section.
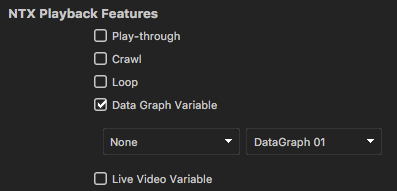
- If you plan to connect the data graph variable to a data source, select a data source from the drop-down list below the Data Graph Variable checkbox and on the left. Otherwise, if you plan to manually enter data for the data graph variable, select None or leave the selection blank.
- In the drop-down list below and to the right of the Data Graph Variable checkbox, select a name for the data graph variable.
Tip: To create a new variable name, double-click the name that is already selected in the drop-down list, enter a name, and press TAB to save the new name.
- Repeat the previous steps in this section to create additional data graph variables in your design.
Later, after you finish customizing the design and close the Title Designer, if you want to connect your design to a data source and drive data to the data graph variables, see one of the articles in the Connect data to designs section of our help center.
Create live video variables
Live video variables are objects that link to a webcam or NDI-enabled camera.
- Select an object in the Title Designer's workspace or timeline.
- Confirm the selected object's dimensions match the aspect ratio of the live video source and, if necessary, resize the object.
Note: If the object's dimensions don't match the aspect ratio of the video source, the live video will be resized to fit within the object, which may distort the video.
- Click the Attributes > Object > Global tab.
- Mark the Live Video Variable checkbox in the NTX Playback Features section.
- Enter a name for the variable in the available field.

Later, after you finish customizing the design and close the Title Designer, you can select a video source for the graphic's live video variable from within the playout interface. See Update variables in live graphics for details.
Create visible variables
A visible variable is an object that appears in a graphic only when data is present for that object. When data is not present, a visible variable object is hidden.
- Select an object in the Title Designer's workspace or timeline.
- Click the Attributes > Object > Global tab.
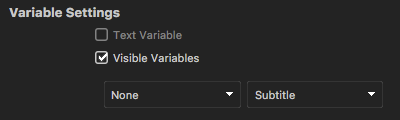
- Mark the Visible Variables checkbox in the Variable Settings section.
- If you plan to connect the visible variable to a data source, select a data source from the drop-down list below the Visible Variables checkbox and on the left. Otherwise, if you plan to manually enter data for the data graph variable, select None or leave the selection blank.
- In the drop-down list below and to the right of the Visible Variables checkbox select a name for the variable.
Tip: To create a new variable name, double-click the name that is already selected in the drop-down list, enter a name, and press TAB to save the new name.
Later, after you finish customizing the design and close the Title Designer, if you want to connect your design to a data source and drive data to the visible variable, see one of the articles in the Connect data to designs section of our help center.